

I was recently tasked with building an iPad floor display that would loop a series of video clips indefinitely in a public place. Surprisingly, it’s not very obvious how to do this, and the third-party applications for looping video don’t work, are expensive, or show ads on the screen while the video plays.
The following solution requires no extra software or apps at all.
Procedure:
Preparing your video for iPad
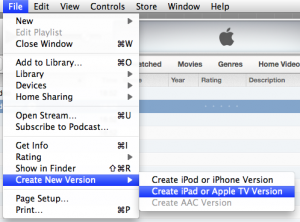 1. If your video is not already on your iPad, or is unplayable on your iPad, you must first convert it into a compatible format with iTunes. In iTunes [instructions developed for v.11.1.1], add your video to the Movies library. Highlight your video, then under the File menu, select “Create New Version” > “Create iPad or AppleTV Version”
Sync your video from the “Photos” section of iTunes
2. Once your video is in the proper format, export it to your desktop by dragging the video out of iTunes and onto the desktop.
3. Create a new folder on the desktop and move the video file inside it.
4. Connect the iPad to your computer, click the “iPad” button under the search box to switch to your iPad, then click Photos.
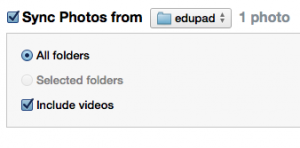 5. Select the checkbox for “Sync Photos from,” and select the new folder you made with your iPad compatible video(s) in it.
6. Select the checkbox for “Include videos.”
7. Click the “Sync” button near the bottom of the iTunes window to transfer the video to the iPad.
Setting the input lock
8. On the iPad, click Settings, then General > Accessibility > Guided Access. Turn Guided Access on and set a passcode. This will enable you to lock the screen and buttons while the iPad is playing your video in a public place.
Setting slideshow looping
9. On the iPad, in Settings, select Photos & Camera, then turn on Repeat.
Starting the video loop
10. To start the show, open the “Photos” app included on your iPad. The icon looks like a rainbow flower.
11. Tap your video until it pops up with a timeline across the top. Then click the icon in the lower left corner of the screen to display some options.
12. Tap “Slideshow,” turn off the Music, and Start Slideshow.
Locking the screen and buttons
13. Once your video is playing, triple-click the home button to turn on the Guided Access feature you enabled earlier. There will be no confirmation that the inputs are locked, but if you try to tap on the screen, nothing will happen.
Disabling hardware buttons
14. Triple-click the home button, enter your passcode, then tap Hardware Buttons at the bottom. There, you can disable the physical buttons on the iPad.
Exiting
15. Triple-click the home button, enter your passcode, and tap End at the upper left.